Sounds easy, but it has come to my attention recently that some people don't have as much experience playing in the dirt as I do. As such, I thought a planting tutorial might be in order. Nothing takes the place of experience, so don't be afraid to get out there and put some plants in the ground and you'll keep getting better at it. The next 2 months are perfect time to practice!
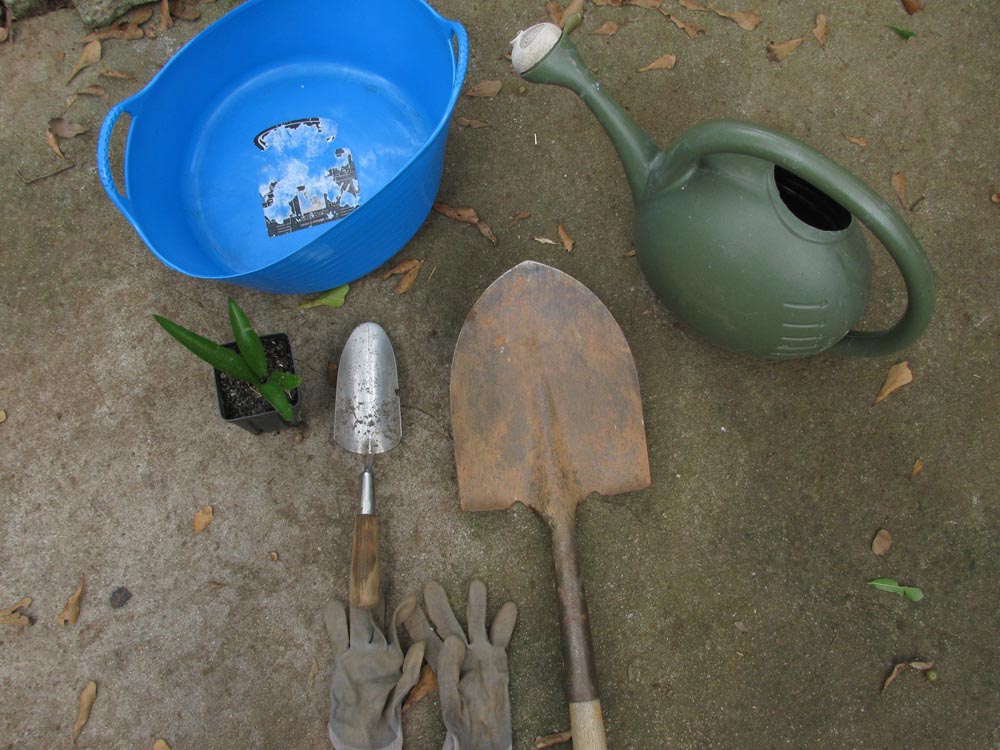
A shovel (I have a small and a big one), gloves are always a good idea, a plant (preferably native!), a source of water, and a bucket or tarp to hold the soil you remove (optional, but it helps for when you are refilling the hole).
Having the right tools is important, but picking the right planting site is absolutely critical. "Right plant in the right place" is a common saying among plant people, and we've adopted it as a mantra of sorts for helping people when they are choosing plants to purchase.

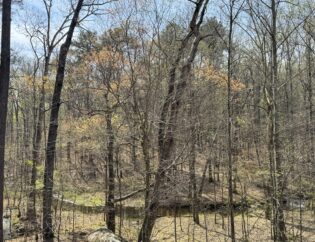
I'm planting a False Aloe (Manfreda virginica) next to two others I planted last year. This is a slightly sloping, well-drained area that gets about 2-3 hours of direct sun per day when the Oak canopy above is leafed out. There are a number of native woodland plants that would thrive in this environment because they are well adapted to living on a forest floor.


Now that we have our site picked out it's time to remove the duff (layer of leaves, etc.) on top of the soil. I'm going to pause right here to issue a stern warning. You need to be certain that there are no power, water or gas lines under your planting site. This area is in my backyard, so none of those things extend beyond the house. I accidentally "discovered" that my gas line is only about 6 inches below the surface when I was planting shrubs in my front yard last year. It's a costly and dangerous mistake that you don't wanna make. If you have any doubts as to the presence of underground utilities at your planting site CALL 811 and find out for sure! If you are certain you aren't going to sever your gas line, we can now proceed to digging.
Using a shovel is fairly straightforward, but I have noticed at several plantings with volunteers that not everyone uses them efficiently. Use your body weight and leg muscles to lean on/push the shovel blade with your foot. I've kicked and jumped up and down on shovels many times to break up clay soils. Your legs and weight will help the shovel penetrate the ground far easier and more efficiently than your arms can, no matter how big your biceps might be.


The soil is out and in the bucket, and as you can see it's almost 100% Georgia red clay. I jumped on the shovel several times to get this hole this deep. Clayey soils are OK as long as there is at least a thin layer of topsoil above them for the plant to take root in, but since it is almost straight clay I'm going to add a little soil amendment.
In the bottom of the hole I put some Mister Natural ® Complete Landscape Mix (CLM). It's a mixture of compost, worm castings and permatill that will aid the plant's ability to take root and penetrate the clay, and it will help with drainage. It's made right here in Georgia too. Now to double check that the hole is deep enough...


Time for another stern warning: DO NOT PULL A PLANT OUT OF A POT BY THE STEM/LEAVES! You will damage or possibly kill it by tearing the shoots from the roots. Instead, put your fingers on either side of the crown, like so:

Invert the pot, as in the photo above. Squeeze the sides of the pot a bit to loosen up the root ball and help it release the pot, and then gently pull the pot upward off the root ball, like so:

It's that easy. With larger round containers you can lay them on their side and roll them back and forth while pushing down on the pot lightly to help loosen the root ball. Next, you're going to want to loosen up the roots. Many plants from nurseries (including ours more often than not) are root bound, and have long since outgrown their containers. The roots circle around and around and form a dense mass. If left like that, the roots will still "think" that they are in the container with no place to go. You need to let them know they can spread out (finally!) and stimulate them to grow. As Lauren says, "You need to tickle the roots." Tease the roots out of the soil by gently rubbing them until they are sticking out on all the edges. In extreme cases of pot bound plants it may be necessary to cut or score the sides of the root ball with a blade to get them to separate. This one isn't too bad, so a bit of "tickling" will do.

Now, put the plant in the ground, like so:

Oops! It's a little too deep now that the root ball has spread out. Never fear, just add some soil to the bottom of the hole until the plant crown is at the right height.

Now try again.


You can test it by using your hand as a level on the edge of the hole. Looks good, so it's time to back fill. Sprinkle the dirt you removed earlier evenly around the plant and over the roots. Break up any large dirt clods and refill the hole back to the level of the surrounding ground. Pat the soil down into the hole until it's firm. As soon as possible add water:

This is a crucial step. The water helps to compact the soil back down into the hole, but it also makes the soil and the plant roots touch at the molecular level. Until I watered, the roots and the soil were not in contact (microscopically speaking). In order for plants to take up nutrients through their roots, they must be in contact with the soil, and water flowing downward through the ground is the main way in which this process is facilitated.

Voila! A happy new addition to my "dry shade" planting area. I hope that this removes any doubts you might have had about your gardening abilities and inspires you to go out an get planting!